I’ve been building and contributing to projects that use Node + express for a couple of years now. Each time we used different patterns and started from scratch with a lot of the necessities to a server. I realized that this was not just time-consuming in its own right, but it also made it difficult for new team members to contribute as it requires some time to get them up to speed with the architecture.
A client once whispered the words “nest” during a Zoom meeting. This quiet word happened to make its way into my ear and sparked a small interest. I’ve heard of it before but dismissed it after learning it was just an express framework. I thought, "why do I want to toss even more stuff on top of Express than I already am 🧐?" I let it go...but it kept eating away at my curiosity as most techy things tend to do...so I cracked and decided to take some time to explore it. And I was so glad I did.
First, let’s get into what Nest is.
A progressive Node.js framework for building efficient, reliable, and scalable server-side applications.
This made me think that a PR team was in their final form as they wrote this and really wanted to hit a bunch of keywords that make devs like us happy. But what does it mean? In order to further express (pun intended) what this means, let’s take a look at some of the general problems we might come across when building an Express server.
Input validation and error handling
- Input validation often requires its own system and teams having to communicate the approach to this. You can create custom middleware to this or just functions but ultimately it requires us to know which errors we want to throw in detail and create a bunch of functions to validate the inputs. This can get messy if you’re not careful and require an additional package like joi in some cases.
- Errors can require you to follow a bunch of conditional flows to see if something exists or not, or if the validation returns a discrepancy. This isn’t too bad but then you might have to make conscious team efforts to collaborate on which layer should take ownership of the error handling.
Patterns to define an architecture or lack thereof
- Express on it does not generate anything by default. There are some CLI tools that you can use or starters but this is often not the best choice as they’re not strictly followed or maintained. This means that you are free to build your application in whichever way you see fit, good or bad.
- You could build the greatest server of all time but if the pattern is hard to follow, or they’re just really isn’t one then onboarding new team members can become difficult.
Documentation is…what documentation??
- Documentation is often left to the dev team to handle. Let’s face it, we don’t always do the best job documenting our applications. Often times we write about what we think is important from our own perspective, which in most cases is just the “getting started” section and that is it. We don’t always do well documenting how to add new features to follow the established pattern, or what routes are in place and their details.
Adding a new feature is time-consuming
- Given a repository pattern where you might have a great file structure, this means you have to manually build out multiple files one at a time which can be very time-consuming.
- This adds a very heavy boilerplate that can take an entire day to write out and more time to define and test out.
Those all sound like a lot of negatives for Express but keep in mind that I’m only pointing those out to define some of the solutions that Nestjs brings to the table. If you truly ♥️ a technology for all of the great things it can do for you, then you also have to acknowledge its pitfalls as well. With that said, let’s create a basic project and go through how Nest solves some of these problems.
Getting started with Nest 🧐
I know you’re excited to get started, but before we create our first project we’ll need to install the nest CLI globally. Open up your terminal and type in the following:
$ npm i -g @nestjs/cli
You can verify that you now have nest installed globally by doing the following:
$ nest --v
You should now see the current stable version of Nest installed. Now we can use the CLI to generate a new project for us. After typing in the following command, it might take a while to install and scaffold the project so please be patient while it does its magic 🧙🏽♂️.
$ nest new project-name
Note: the project-name will be the name of your project, so feel free to change this as you see fit.
You should now see something similar to the following:
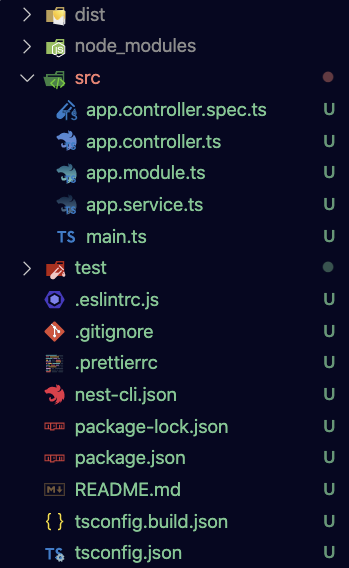
Our main app files will live within the src directory, where we will find our main.ts file. Before moving on and exploring the directory in more detail, let's first run our application and make sure that everything works.
$ npm run start:dev
You should see some messages in your terminal defining what actions Nest is taking. As you begin to fill out your app with more “stuff,” you’ll see it taking steps to load your controllers and modules and establish dependencies. Open your browser and go to http:localhost:3000/, you should see a message on the page that says "hello world." Let's explore your files now and find out where the code responsible for this lives and how it works together starting with main.ts. 👀
import { NestFactory } from '@nestjs/core';
import { AppModule } from './app.module';
async function bootstrap() {
const app = await NestFactory.create(AppModule);
await app.listen(3000);
}
bootstrap();
In a nutshell 🥜, this is your index.js or server.js in a regular express app. It is where your actual server app lives. You'll be able to apply your middleware here and define which port your server should be on. Notice that it is importing AppModule from ./app.module, let's take a look at what's in there. We'll be revisiting this file again later.
import { Module } from '@nestjs/common';
import { AppController } from './app.controller';
import { AppService } from './app.service';
@Module({
imports: [],
controllers: [AppController],
providers: [AppService],
})
If you have ever used Angular on the Front End, you’ll find a lot of similarities between the two as they both use decorators and have a very similar implementation. The module directories will inform the app as to what the rest of its directories will look like and what their roles should be. In express, this is often done by you manually through a cycle of imports. As you add modules later to your app such as Users, Projects, Organizations, etc., these modules will be added here. Notice as well that the decoration is also informing us of what controllers and providers belong to this main module. Let’s take a look at the controller next.
import { Controller, Get } from '@nestjs/common';
import { AppService } from './app.service';
// Controller decorator establishes the route
// adding 'app' string to it changes the route to localhost:3000/app
@Controller()
export class AppController {
constructor(private readonly appService: AppService) {}
// allows you to nest routes
// adding 'hello' string to it changes the route to localhost:3000/app/hello
@Get()
getHello(): string {
return this.appService.getHello();
}
We can think of the controller as where our endpoints would normally be defined and what they should do in a sense. Remember when you opened your browser and saw that the root directory presented you with the “hello world” message? The @Controller() decorator defaults the path to /. So, if we change it to the following:
@Controller('app')
If we refresh our browser, we should now see an error on the page similar to:
// 20210410222848
// <http://localhost:3000/>
{
"statusCode": 404,
"message": "Cannot GET /",
"error": "Not Found"
}
This is because we changed the route earlier in our decorator to be the app. So now, if you go to [<http://localhost:3000/app>](<http://localhost:3000/app>) you should see our precious "hello world" message again. If we look at the rest of the code, we'll see the method which is calling the getHello() service.
@Get()
getHello(): string {
return this.appService.getHello();
}
If we wanted our route to be http://localhost:3000/app/hello, then all we have to do is add the following to the @Get() decorator:
@Get('hello')
Now you should be able to check out that URL and see that our “hello world” message has relocated once again. We can come back here again once we’ve explored the app.service.ts file and build out some services.
import { Injectable } from '@nestjs/common';
@Injectable()
export class AppService {
getHello(): string {
return 'Hello World!';
}
}
In most cases, service will be where your communication with your ORM happens. In this case, we aren’t establishing that connection yet (that will come in a later post), we’re simply returning a value once the getHello() method is called from AppService. We've finally reached the point where "Hello World!" is being created 🎉🎊. We can imagine doing many other things here right now but instead, let's create a feature of our own to walk through the steps that lead to all of this pattern.
Adding a Feature 💆🏽♀️
In express, if we wanted to add a new feature we had to do it manually. We had to create files that fit the established pattern and add all of the logic in. Of course, this can get daunting and eat up a good chunk of time. Nest provides us a few CLI commands to do this for us.
From the list above, we’ll be using generate often to create new features. We can create a User feature with the following commands one file at a time.
$ nest generate module users
$ nest generate service users
$ nest generate controller users
After generating the module, you’ll see it automatically added to the app.module.ts import within the decorator.
import { UsersModule } from './users/users.module';
@Module({
imports: [UsersModule],
controllers: [AppController],
providers: [AppService],
})
Then after adding the service and controller, you see it added to your user.module.ts automatically so you don't need to worry about making this connection yourself. Personally, I don't like having to add each individual file so I'd rather scaffold them all at once. That is exactly what the next command will do for us.
$ nest g resource users
This command comes with a few extra choices as it can build into different things depending on your selection. If you choose to use this command, to follow along with this article, you can select RESTful API as your first option, and then answer yes to CRUD if you would like. We'll be building out the additional directories that are scaffolded by this option. Your file structure should now include a folder called users and include the following files:
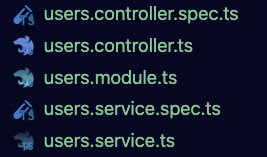
Many of the concepts we already covered in the app structure apply here. You’ll notice that it shares the exact same pattern which will be shared throughout the entirety of your app as you build it out. This makes it much easier for your team members to learn the pattern and be able to contribute. As we saw that adding a new feature is just a quick command and familiarizing yourself with the pattern is very simple. We can skip users.module.ts as it will be similar to its app counterpart with no new additions and begin by looking at users.controller.ts.
Let’s begin by adding our getUsers endpoint.
import {
Controller,
Get
} from '@nestjs/common';
import { UsersService } from './users.service';
@Controller('users')
export class UsersController {
constructor(private usersService: UsersService) {}
@Get()
getUsers(): any {
return this.usersService.findAll();
}
}
You’ll notice this pattern is also currently similar to our apps as well. Before moving on to our service file, let’s also add the getUsersById controller as well since we're in the area.
@Get(':id')
getUserById(@Param('id') id: string): any {
const user = this.usersService.findById(Number(id));
return user;
}
Woahhh 👀 ! That looks a little different than the getUsers method? You're correct! This method presents a few key differences from the previous.
- @Get decorator now has a :id inside of it. If we remember our earlier coverage of this decorator, adding a string inside of it appends to the route. In this case, is creating a variable for the user's id for us. This will come to us in the form of a parameter.
- @Param was added to the parameters for the getUserById. This is a built-in Nest decorator that allows us to define what our params look like for this endpoint. In the strings, we're able to give it the name of id then use typescript to define what an id should be, in our case it will come in as a string. We'll need to change this later as we'll be using numbers as a string.
- Our service call is using (Number(id)), this is because our ids will be numbers so we're having to manually typecast them from a string to a number. We'll explore how Nest can do this for us later with Pipes.
Now that is out of the way, let’s check out our users.service.ts file
import { Injectable } from '@nestjs/common';
@Injectable()
export class UsersService {}
Wow, so much empty! If you used the scaffolding command then you might actually have some stuff written in here thanks to the CRUD option which is pretty nice, we're going to work this out from scratch. First, because we won't be using a database for this article (later article), we'll create an array of users to interact with. Note that normally this is where you would introduce an ORM rather than saving data in memory like we're about to do. Let's add that array in now.
@Injectable()
export class UsersService {
private users: User[] = [ // these are my team members LOL
{ id: 0, name: 'Andre' },
{ id: 1, name: 'Carlos' }, // <-- hey, that's me
{ id: 2, name: 'Emily' },
{ id: 3, name: 'Norbert' },
{ id: 4, name: 'Alex' },
];
Great!! Now we have users that we can interact with. We can now move on to creating our services.
findAll(): any {
return this.users;
}
findById(userId: number): User {
return this.users.find((user) => user.id === userId);
}
That’s it! We’re done and we can now put up a Pull Request for review, pack our stuff, and go home. Just kidding, this is where the fun begins actually. In express, normally when we get to this point we would end up having to open up Postman or Insomnia to test our endpoint and validate responses and exceptions. To me, this is daunting and doesn't really contribute to anything but our own personal testing. Instead, what we can do is include swagger documentation. So let's take this time to talk about Swagger: what it is and what it can do for us and our team.
Toss in some Swagger 😎
Swagger is an interactive documentation tool that allows you to detail your endpoints. You do these multiple ways like visiting their website and utilizing their API tools to generate documentation. We’ll be taking a different approach which will allow us to implement the documentation as we work and generate the swagger docs whenever someone hits a /docs route. First, we'll need to install swagger UI into our application.
$ npm install --save @nestjs/swagger swagger-ui-express
Because Nest uses ExpressJS, we’re allowed to use modules that are meant for Express as part of Nest. This means that we can get the best of both worlds. Now that we have the swagger UI installed, we can go into our main.ts file to add in the middleware and pass some configuration options.
import { NestFactory } from '@nestjs/core';
import { DocumentBuilder, SwaggerModule } from '@nestjs/swagger';
import { AppModule } from './app.module';
async function bootstrap() {
const app = await NestFactory.create(AppModule);
// configuration for swagger, we can set different values
const config = new DocumentBuilder()
.setTitle('Our Nest API')
.setDescription('Super cool API that uses Nest to return Users')
.setVersion('1.0')
.build();
// tells the swagger module to create the document
// with the config options we just built up
const document = SwaggerModule.createDocument(app, config);
// sets the route for the docs, adds it to the our app
// and passes in the documentation
SwaggerModule.setup('/docs', app, document);
await app.listen(3000);
}
bootstrap();
And that’s it! Now we should be able to open our browser to the docs endpoint [<http://localhost:3000/docs>](<http://localhost:3000/docs>) and see our swagger docs begin to form. Now we can test out our two endpoints.
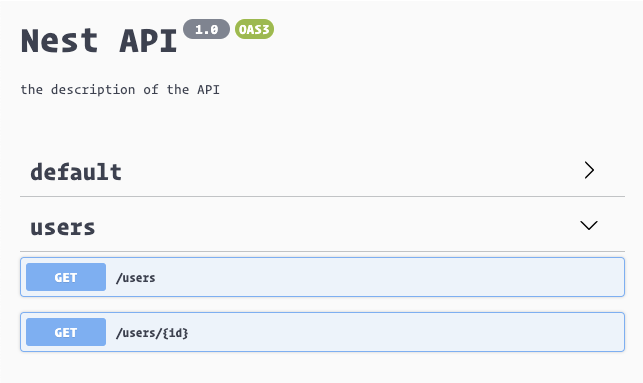
Notice that the details we added to our configurations are used to populate the header data of the page. We should also see our two super awesome endpoints on full display. We can use these to test our work and document our endpoints for others to see and use. Just from a few lines of code, we’re already getting a lot of value but as we explore our endpoints in more detail, we’ll see that many things are missing. Swagger can’t really tell us ahead of time what our objects should look like or what we should expect to get back. This is a problem as it doesn’t define our intent or help us or teammates very much. We’ll fix that now.
Even more Swagger! 😎 x2
First, we’ll realize that we’re not using much of the great advantages that typescript is providing us. We’re dropping any everywhere and so we don't know what to expect from our function calls. Let's take this time to fill out create the entity that will define our user. In your /src/users directory, add a new folder called entities. Then create the file users.entity.ts.
import { ApiProperty } from '@nestjs/swagger';
export class User {
@ApiProperty()
id: number;
@ApiProperty()
name: string;
}
Here we’re defining a User entity with an id and name (the two fields we provided our users array in our service file). We're also including a super fancy swagger decorator @ApiProperty(). You can check out the documentation for more details but essentially this lets swagger know that these are properties for the User type. We can also pass an object to define a field as not required.
@ApiProperty({ required: false })
There is also a plugin that you can opt into if you would like to have swagger do this automatically for you. In a smaller project, this won’t be such a big deal, but in a bigger project this would get very verbose so let’s add that plugin and remove the above @ApiProperty() decorators. Note that you will make ALL of your fields required by default, so if you have any that should be optional, please add the above-required option. Let's open our nest-cli.json in the root directory and in our plugin.
{
"collection": "@nestjs/schematics",
"sourceRoot": "src",
"compilerOptions": {
"plugins": ["@nestjs/swagger"]
}
}
That’s it! Now we should be able to remove our @ApiProperty() from our user entity. Now we can finally go back to our users.service.ts file and adding in our newly created user type.
import { Injectable } from '@nestjs/common';
import { User } from './entities/user.entity';
@Injectable()
export class UsersService {
private users: User[] = [
{ id: 0, name: 'Andre' },
{ id: 1, name: 'Carlos' },
{ id: 2, name: 'Emily' },
{ id: 3, name: 'Norbert' },
{ id: 4, name: 'Alex' },
];
findAll(): User[] {
return this.users;
}
findById(userId: number): User {
return this.users.find((user) => user.id === userId);
}
}
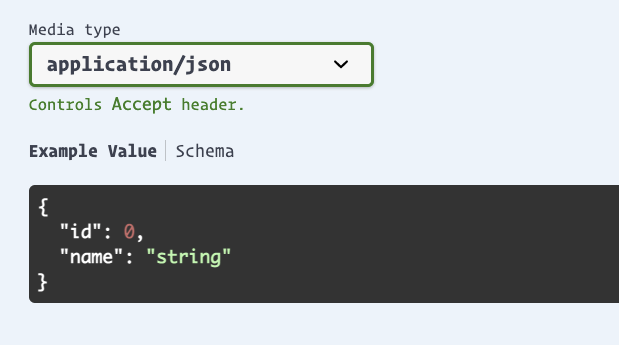
Great! Now when we take a look at our swagger docs, we should see the following Schema included. This will allow everyone to see what is expected from your endpoints, as your server scales and includes more endpoints, this will become extremely valuable for us.
Adding a POST method
I noticed that some of my teammates are missing from our list of users. Let’s fix that by adding a POST method. Let’s begin by moving onto our users.controller.ts and adding in the code for creating a user.
@Post()
createUser(CreateUserDto): User {
return this.usersService.createUser(body);
}
Again with the new stuff!! Let’s go over some of the additions that this method has brought in.
- @Post() decorator - similar to its @Get() counterparts, it allows us to define a nested endpoint for this request (optional).
- CreateUserDto type - DTO stands for Data Transfer Object, this is not a built-in element. Data Transfer Object is a term that defines the object that will be transferred into a database. I Like to think of this as being the opposite of an entity. While an entity can define an object coming out of the database, the DTO would define the data that is being transferred in. These two are not always exclusive and can be of different shapes or types.
With that out of the way, let’s create our DTO now. Within your user’s directory, create a new folder and name it dto, then add a file called create-user.dto.ts. The naming isn't anything special, we're just following a pattern similar to what we'll find in the rest of the project. Inside the newly created DTO file, we can add in what we expect to be returned as the response object.
export class CreateUserDto {
name: string;
}
Now we can import it and use it in the POST request for our user in our users.controller.ts file. Now we can get into our users.service.ts file and add the logic to push the user into our in-memory array.
createUser(createUserDto: CreateUserDto): User {
const newUser = {
id: this.users[this.users.length - 1].id + 1,
...createUserDto,
};
this.users.push(newUser);
return newUser;
}
This is great as we now know the shape of our response and body objects. Earlier, however, we talked about validation being a built-in part of NestJS. Normally at this point, we would either handwrite a bunch of validation for our params or bring in a library to attempt to do it for us. Both of these solutions require some boilerplate and intrusive logic management. Nest, this is a lot simpler. We can start by using the ValidationPipe, you can read more about this here in the docs but essentially, this provides us with access to the following already included libraries.
- Class validator — A decorator validator that uses validator.js under the hood.
- Class Transformer — This allows you to transform a plain object to some instance of class and versa.
To add this to our Nest project, we can do so in our main.ts.
import { ValidationPipe } from '@nestjs/common';
import { NestFactory } from '@nestjs/core';
import { DocumentBuilder, SwaggerModule } from '@nestjs/swagger';
import { AppModule } from './app.module';
async function bootstrap() {
const app = await NestFactory.create(AppModule);
app.useGlobalPipes(new ValidationPipe());
const config = new DocumentBuilder()
.setTitle('Nest API')
.setDescription('the description of the API')
.setVersion('1.0')
.build();
const document = SwaggerModule.createDocument(app, config);
SwaggerModule.setup('/docs', app, document);
await app.listen(3000);
}
bootstrap();
Now we can begin taking advantage of this by going into our users.controller.ts and some decorators and pipes.
// the import
import { ParseIntPipe, Param, Body } from '@nestjs/common';
// in our controller class
...
getUserById(@Param('id', ParseIntPipe) id: number): User {
return user;
}
createUser(@Body() body: CreateUserDto): User {
return this.usersService.createUser(body);
}
- @param() - This decorator is used to validate request parameters. In this case, we're using it to validate that our id is a number now instead of a string.
- ParseIntPipe - Because of the nature of JSON parsing, the id comes in as a string but our database ids are all numbers. This pipe will type-cast the id for us from a string to a number so that we can remove the old logic forcing us to do it ourselves.
- @Body() - This decorator allows us to validate incoming items coming through the request body. This means that if an issue is found at this level, we won't have to write logic to capture this and send a user-friendly error, Nest will take care of this for us. But how does it know
Now we can go into our DTO file and further define any constraints that we would like.
import { IsAlphanumeric, MaxLength, IsNotEmpty } from 'class-validator';
export class CreateUserDto {
@IsNotEmpty() // validates name is not empty
@IsAlphanumeric() // validates name is alphanumeric
@MaxLength(10) // validates name is no longer than 10 chars
name: string;
}
The above validation would normally take an entire system of handwritten regex wizardry and other conditional logic. We were able to write a few lines and add this validation. We can even go into our Swagger UI docs and test these out on our POST and GET by id endpoints to see the different error messages that we get.
Queries — the hidden jewel of RESTful APIs
Queries often require some parsing and logic to define, NestJS lets us define and validate this all in one line in our users.controller.ts.
import { Query } from '@nest/common';
getUsers(@Query('name') name?: string): User[] {
return this.usersService.findAll(name);
}
Then make a quick change to incorporate this into our service in users.service.ts
findAll(name?: string): User[] {
if (name) {
return this.users.filter(name);
}
return this.users;
}
Error handling
Nest comes with a built-in exception layer that handles the processing for all unhandled exceptions across your application. This means that when an exception is not handled by your app (say you forgot to write one or just didn’t get detailed enough with your exceptions), it will bubble up to this layer which will automatically send an appropriate user-friendly response. This is important as we can easily miss some common exceptions, or it can just be time-consuming to write the logic needed for some of them.
// basic usage of HttpException class
@Get()
async findAll() {
throw new HttpException('Forbidden', HttpStatus.FORBIDDEN);
}
// overriding the entire response body of the HttpException class
@Get()
async findAll() {
throw new HttpException({
status: HttpStatus.FORBIDDEN,
error: 'This is a custom message',
}, HttpStatus.FORBIDDEN);
}
Here we are seeing an exception handler in action called HttpException(). This class is the base from which all other Nest exceptions are extended to give out more detailed user-friendly error messages. We can also use it to create our own custom error objects that extend from the HttpException class.
// implementation
export class ForbiddenException extends HttpException {
constructor() {
super('Forbidden', HttpStatus.FORBIDDEN);
}
}
// usage in your controller
@Get()
async findAll() {
throw new ForbiddenException();
}
Obviously, it wouldn’t be much fun to have to write a bunch of custom exception handlers that extend from HttpException each time you come across a new common exception that you have to deal with. For this, Nest provides a bunch of premade built-in HTTP exception classes that already do this complete with user-friendly error messages.
Let’s say that we have a very common case where we want to search for a user by id but they do not exist in our database. This often requires a few things to happen on our side of the server building process. First would probably be the auth check, then parameter validation, then finally exception handling. We’ll be talking about that last part here by using Nest’s NotFoundException class.
getUserById(id: number): User {
const user = this.usersService.findById(id);
if (!user) {